Pages

Tuesday, March 31, 2009

True Beauty: A Review

Each year Vision Forum hosts a very special weekend for fathers and daughters to deepen their relationships and to be encouraged. Although I have never been to one of these retreats I have had the pleasure this past month of listening to the eight CD set from last years retreat.

At the 2008 Father Daughter Discipleship Retreat speakers Doug Phillips, Scott Brown, Geoffrey Botkin and daughters Anna Sophia and Elizabeth Botkin brought six messages that were filled with biblical exhortation, practical advice and vision for biblical father daughter relationships. The issues addressed included how a daughter should relate to every member of her family, how to prepare for marriage to a godly courageous man, what a true beauty looks like, the Proverbs 31 woman, and how fathers are to protect the daughters in their home. Every message painted the picture of the biblical woman God wants each of us to become and aim for to His glory.

It took me several weeks to get through this set, there was just so much to chew on. I have read several books on the subject of biblical womanhood, yet I still find I need the fresh encouragement as it is a subject so highly contended not just in the culture of the world but the church as well. As I listened I was exhorted, I learned new things, I renewed my vision for what God wants me to become, and I was rebuked for where I have failed. All of the CDs were good, but if I were to pick a favorite it would be the message by Scott Brown on the Proverbs 31 woman. He presented 12 key principles from Proverbs 31 that should be the mark of a godly woman, I found this especially helpful in guiding me as I seek to educate and prepare my self toward that ideal.

If you too are looking for encouragement as a daughter remaining at home or are just catching the vision to return to your father's house you will find this set a great blessing. It would also be great if you and your father could listen to it together. To read more about this set or purchase it click this link to the Vision Forum website.

List of the CD titles included in True Beauty:
  1. Foundation Vision for Father & Daughters ~ Doug Phillips
  2. The Proverbs 31 Woman ~ Scott Brown
  3. Transitions from Beautiful Girlhood to Noble Womanhood ~ Anna & Elizabeth Botkin
  4. Beauty: What Is It? ~ Doug Phillips
  5. Fathers, Daughters, & Family ~ Panel Discussion
  6. Continued from CD 5
  7. How to Prepare a Daughter for Marriage ~ Geoffrey Botkin
  8. How Fathers Can Protect Their Daughters in a Defiling Age ~ Scott Brown

Tuesday, March 10, 2009

Seed Starting the Frugal Way

Great Rewards of Simple Planning Series
And the earth brought forth grass, and herb yielding seed after his kind, and the tree yielding fruit, whose seed was in itself, after his kind: and God saw that it was good.
Genesis 1:12

I got the first seeds of the year planted today and I wanted to share with you how I start my plants from seed. It really isn't that complicated and only requires a few simple supplies. Although it may sound time consuming keep in mind that it is over a 1-3 month period. Starting your own seeds not only saves you nice sum of money it is very satisfying. Normally when I start my seeds the snow is still on the ground and it comes as a great encourager that spring is just around the corner.

You will need:

  • Soil (be sure to get soil specifically mixed for seed starting)
  • Containers
  • Seeds
  • Heating Pad (optional)
  • Water
  • Sunshine (or grow lamps)
  • Tender Loving Care

Now, it is possible to start seeds in just any old soil, but you are really taking your chances; and you probably don't want to have to throw out half of your plants because the soil had some disease in it. For the same reason you will need to sterilize any containers that have had soil in them. The choice of containers is very wide and the way you plant in them just as varied. You do not need to purchase any of those special seed containers that fill the shelves at you local garden center, whatever you have on hand is best for you because it comes at no extra cost. You can use:
  • small and large planters,
  • tin cans, styrafoam cups,
  • plastic containers such as berries come in,
  • egg crates,
  • cardboard box lined with plastic,
  • milk jugs and cartons,
  • yogurt cups,
  • soda cans,
  • pop bottles,
  • sectioned planters from last years plants,
  • and on and on.
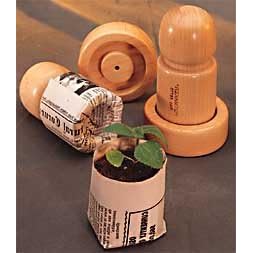
Basically anything that will hold the soil together, and either has holes in the bottom or can be punctured. You can even purchase a nifty little PotMaker that transforms newspaper into perfect sized biodegradable seed pots. What I am using this year is old containers from last year and recycled produce containers. I was able to make some removable dividers from some old plastic salad boxes for the berry containers to separate them into six plant cells. I cut them so that the vertical dividers would lock into the horizontal divider. When it comes time to transplant all I will need to do is wet the soil and pull out the dividers resulting in six separate soil blocks containing the little plants.
I lined the bottom with a piece of wet newspaper before adding the dividers to prevent the soil from escaping while still allowing good drainage. You will want to do this with any container that has large holes.

Once you have your supplies together it is time to get started.
  1. Sterilize containers by washing them in a ten percent bleach solution, rinsing them out and letting them air dry.
  2. Pour your soil into a bin and add water a little at a time mixing it with your hand until it begins to feel like a rung out sponge when squeezed, and starts to hold together.
  3. Fill your pots with the moist soil leaving 1/4 to 1/2 inch of space at the top. Tamp down lightly to create a bouncy soil.
  4. Sprinkle seeds over the surface of large containers and for separated containers that are small or have cells just place 2-4 seeds around the center of the cell. Press seeds lightly so they get good contact with the soil.
  5. Spread dry soil on top of seeds. Your seed packet may have a recommended depth printed on the back. A good rule for how much to spread on is the seed depth in the soil should be about 1-2 times the diameter of the seed. So a seed with the diameter of 1/8" should be covered with 1/8-1/4" soil. It don't have to be perfect though, just somewhere in the vicinity.
  6. Cover with something clear, such as an open zippy bag or plastic wrap (spread over tooth picks placed in the soil and secured with a rubber band), and place in some type of tray to catch any soil or water. My containers had the lids that came with them so I snapped those on and wrapped plastic wrap over the tops to cover the holes.
  7. Place in a warm spot like the top the refrigerator or on a heating pad set on low. Most vegetable seeds do not need light to sprout so you can cover them with a towel to hold moisture and heat when they are just starting.
  8. Check on them every day to see if they are have sprouted. If the soil looks dry mist with water or pour some water into the tray under them. DO NOT pour directly on the soil as that may disturb you little sprouts.
  9. Remove everything off the top once most of them have sprouted and place them in a sunny south facing window. If the window is cold you may want to continue the heating pad until they are well established. At this point you will need to divide the sprouts in the large container and transplant them to their own individual pots. If they were planted in divided pots wait until they have their full two leaves then thin to one strong seedling per pot.
  10. Transplant them to larger pots as thy out grow their little ones unless the pot you started them in is big enough. You can use regular potting soil for that. Normally the ones you start later in the season such as brassicas, squash, and herbs can be transplanted from their small pots directly to the garden whereas the early ones such as tomatoes and peppers need to be transplanted as they get bigger, especially tomatos. I have found that tomatoes need a milk jug size container and peppers a tin can size one.
  11. Harden off your plants when it starts to get close to planting time. For simple instruction for this check out this link. You may start this process early on when you start getting warm days if they are outgrowing your window, just be sure to bring them in at night. I hope to start keeping my larger plants in my cold frame once they outgrow our window, as long as the nights aren't to cold they should be fine if I have started to harden them off.
  12. Transplant to the garden according to each plants transplant date. Normally that is printed on the seed packet in relation to your areas last frost date.
For more information you can find instructions in any basic gardening book such as Gardening 101 by Martha Stewart Living Magazine.

Friday, February 27, 2009

The Planetary System ~ Darwin


1. Fair star of Eve, thy lucid ray
Directs my thoughts to realms on high:
Great is the theme, though weak the lay,
For my heart whispers God is nigh.

2. The Sun, vicegerent1 of his power,
Shall rend the veil of parting night,
Salute the spheres, at early hour,
And pour a flood of life and light.

3. Seven circling planets I behold,
Their different orbits all described;
Copernicus these wonders told,
And bade the laws of truth revive.

4. Mercury and Venus first appear,
Nearest the dazzling source of day;
Three months compose his hasty year,
In Seven she treads the heavenly way.

5. Next earth completes her yearly course;
The Moon as satellite attends;
Attraction is the hidden force,
On which creation's law depends.

6. Then Mars is seen of fiery hue;
Jupiter's orb we next descry;
His atmospheric belts we view,
And four bright moons attract the eye.

7. Mars, soon his revolution makes,
In twice twelve months the Sun surrounds.
Jupiter, greater limits takes,
And twelve long years declare his bounds.

8.With ring of light, see Saturn slow,
Pursue his path in endless space;
By seven pale moons his course we know,
And thirty years that round shall trace.

9. The Georgium Sidus2 appears,
By his amazing distance known;
The lapse of more than eighty years
In his account makes one alone.

10. Six moons are his, by Herschel3 shown,
Herschel, of modern times the boast;
Discovery here is all his own,
Another planetary host!

11. And lo! by astronomic scan,
Three stranger planets track the skies,
Part of that high majestic plan,
Whence those successive worlds arise.

12. Next Mars, Piazzi's orb is seen,
Four years six months, complete his round;
Science shall renovated beam,
And gild Palermo's favored ground.

13. Daughters of telescopic ray,
Pallas4 Juno, smaller spheres,
Are seen near Jove's5 imperial way,
Tracing the heavens in destined years.

14. Comets and fixed stars I see,
With native luster ever shine;
How great! how good! how dreadful! He,
In whom life, light, and truth combine.

15. Oh! may I better know his will,
More implicitly obey;
Be God my friend, my father still,
From finite -- to eternal day.

Now, lest you think your eyes deceive you about the author of this poem I will inform you that this is not the more famous Darwin, though I have not yet been able to track down his first name (just try to Google Planetary System by Darwin and see what you find). If only the world had listened to this Darwin instead.

I discovered this beautiful and very educational poem (you could do whole unit study on it) in an antique school book printed in 1839 called The Reader and Definer: Pieces in Prose and Verse Designed for the Higher Classes by Albert Picket and John Picket. I have always been fascinated with school books printed before 1900, to consider the great thinkers educated by these books alone should make us wonder where we have went wrong with modern education. Perhaps this excerpt from the preface of the above mentioned book could give us a clue:
This second part of the New Juvenile Reader has been prepared with the direct reference to the objects of instruction -- the communication of ideas -- which are the elements of thought -- and the formation of moral character. The selection, therefore, are suited to the strength of young minds; to convey accurate and definite ideas, and to promote the growth and health of the moral affections.
All these old school books I have collected are based on a Biblical worldview and I don't mean Deistic either, Christ is often mentioned and extolled. As we homeschoolers seek to train up the next generation according to Scriptures I think we need to dust off these old educational books and reprint them (perhaps even update them a little) to use to educate true great thinkers -- those founded in the Word of God.


1VICEGE'RENT, n. [L. vicem gereus, acting in the place of another.] A lieutenant; a vicar; an officer who is deputed by a superior or by proper authority to exercise the powers of another. Kings are sometimes called God's vicegerents. It is to be wished they would always deserve the appellation.
VICEGE'RENT, a. Having or exercising delegated power; acting by substitution, or in the place of another.
~ Webster's 1828 Dictionary.
2 Uranus the planet.

3 astronomer (born in Germany) who discovered infrared light and who cataloged the stars and discovered the planet Uranus (1738-1822)

4 large asteroid; the second asteroid to be discovered

5A name for Jupiter.

Monday, February 02, 2009

The Great Rewards of Simple Planning: Vegetable Garden Planning in Limited Space

I have found that prior planning of my small garden is essential in order to reap a greater harvest at a lower price. Garden planning is something my father (the main gardener in our house) never did -- but then he did not start seeds indoors, succession plant or implement as many space saving ideas as I do. Also, I find planning my garden ahead of time takes away a lot of stress when it comes time to plant. Come Spring I can just focus on getting those vegetables into the ground and watching them grow.

1. Make your layout. Draw a scale (like 1/4in. = 1ft.) drawing of your garden space on a piece of notebook paper and put an arrow pointing North. Mark rows and pathways on your sketch. If you don't already have permanent (or raised) beds and walk ways I highly suggest you plan them into your garden this year especially if you are dealing with limited space. Then you can make a master plan of your garden that you can just make copies of each succeeding year to use for your layout. Thus eliminating this step from here on out. To learn of all the benefits of permanent bed gardens and how to achieve them read Gardening for Keeps and Build Permanent Beds & Paths.

2. Decide which plants you want and how much space they need. Now it is time to get out the seed catalogs if you plan on ordering seeds. If not just write down all the plants you think you will want to grow this year. When dealing with small spaces you will want to take into consideration which vegetables and fruits cost the most at market. For instance don't waste you time, space and money on potatoes when you could be growing tomatoes. Once you have an idea of which plants you want to grow you need to find out how much space each one needs and how many days to maturity. If your not sure you can check out this seed spacing chart and this maturity chart for the most common vegetables.

3. Choose each plant's spot and determine quantity needed. Determine how much space you want to devote to each plant from you total sq. footage (including your garden rows only). Using the information from the previous steps you can mark in pencil where you want to plant each vegetable. For larger plants such as tomatoes and peppers you can mark where each plant will go using your scale to place them at appropriate distances from each other. For your other smaller plants (such as onions, lettuce, spinach) you can just mark their boundaries. Here are few tips to keep in mind when planning a small garden:

  • You can plan to plant your early maturing plants around your late maturing plants (see my garden plan above).
  • Place your tallest growing vegetables on the North side of the garden to keep them from shading you shorter plants.
  • Grow as many plants upward as possible to conserve on space. Good plants to grow on supports are pole beans, indeterminate tomatoes, squashes (as long as their fruit don't become to heavy), cucumbers, peas and melons. To read about growing vertical check out Tower Power and How to Build an A-Frame Trellis. This year I plan on building all my garden supports out of branches from the woods near our house and lumber salvaged from pallets (except for the tomatoes cages that I have left over from last year). A little imagination can go a long way. I'll let you know how they turn out.

4. Order seeds, build supports. Between now and planting time you need to order the seeds you are going to start indoors and those you are going to sow directly outside. I normally start scouring my seed catalogs in December and order the end of January or beginning of February since I need to start my tomatoes and peppers in March. If you plan on buying your plants then you can buy your seeds at the same time or a month before you last frost date order from a catalog. At this time you might also want to consider marking a calendar for any succession planting you want to do. I highly recommend succession planting for crops such as radishes, onions, lettuce and spinach so you don't get them all at once. For more information read How to Plant Succession Crops. Be sure also to build those supports or purchase them before you begin planting. By erecting your supports when you plant you can avoid damaging the roots once the plants are established.

Now you are one step closer to a highly successful garden season. Stay tuned, I plan on posting next week about my seed prorogation from our one small south facing window-- it is possible!

Tuesday, January 27, 2009

The Great Rewards of Simple Planning: Composting

The first area I am going to address is the garden, since right now is the time to be making those preparations even if, like me, you have a couple of feet of snow on the ground. Today it is going to be about making compost.

Composting is the number one way to improve your soil. You can save a lot a money and have a healthy soil by harnessing this natural process. It may takes several months to make but the steps are very easy and can become a part of your daily routine, like taking out the garbage.

1. Set apart an out-of-the-way spot in your yard to be your compost corner. Now you don't want it to be to far from your back door though as you will need to access it every day or two. Your composting can be done in as a heap or you can build an enclosure for it out of pallets or chicken wire (for a cylinder). For simple instructions for several different home built models click here and for more complex here.

2. Begin keeping a compost bucket in your kitchen. The humble ice cream bucket works great and can be stored under the counter near where you normally chop up vegetables. Take it out as it gets to full. I have really been surprised how fast ours fills up. The number of things that can go into it are by no means limited to vegetable scraps. Be sure to also put your coffee grounds (w/filter), tea bags, moldy bread, stale crackers and chips, egg shells, freezer burnt vegetables, and several other non-meat and non-dairy products that have seen their better days.

3. Turn it, water it , leave it. Once it gets around 3 to 5 cubic feet start adding your new additions to a new pile. If it is really cold you just leave it. When it starts feeling like Spring you need to check it about every week or so to make sure it is moist and turn it. It should be ready in 2-4 months. If your in no hurry and can wait a year just put some dirt on top and leave it to do its job.

4. Get it ready for the soil. Compost is mature when it is dark brown. It should be crumbly with very few large particles and have an earthy smell. It will also be about 1/3 its original size. To test it place a small amount into a sealed bag and let it sit for 4 days. If it smells like ammonia or smells rotten it isn't ready. When it is ready sift it through a frame fitted with some hardware wire to remove anything to big. Now it is ready to use. You can either store it in some buckets or apply it straight to the garden as a manure or mulch.

The Great Rewards of Simple Planning Series: Introduction


There be four things which are little upon the earth, but they are exceeding wise: The ants are a people not strong, yet they prepare their meat in the summer;
Proverbs 30:24,25

We all have something in our mind that we want to become or accomplish yet it just seems so far out of our reach that we just lay it to rest and plunge through another day. But often they are just at our fingertips, we simply need to do a little planning ahead. So I want to share with you in a blog series some simple preparations that have helped me realize great rewards . I am not sure how long this series will be, but I plan to post on it at least once a week. It will include my gleanings about:
  • Composting
  • Garden Planning for Limited Space
  • Seed Propagation
  • Vegetable Ferments
  • Sourdough
  • Soaking Grains
  • And More

I hope you can learn a little from my ramblings.