Pages

Showing posts with label frugal. Show all posts

Tuesday, March 10, 2009

Seed Starting the Frugal Way

Great Rewards of Simple Planning Series
And the earth brought forth grass, and herb yielding seed after his kind, and the tree yielding fruit, whose seed was in itself, after his kind: and God saw that it was good.
Genesis 1:12

I got the first seeds of the year planted today and I wanted to share with you how I start my plants from seed. It really isn't that complicated and only requires a few simple supplies. Although it may sound time consuming keep in mind that it is over a 1-3 month period. Starting your own seeds not only saves you nice sum of money it is very satisfying. Normally when I start my seeds the snow is still on the ground and it comes as a great encourager that spring is just around the corner.

You will need:

  • Soil (be sure to get soil specifically mixed for seed starting)
  • Containers
  • Seeds
  • Heating Pad (optional)
  • Water
  • Sunshine (or grow lamps)
  • Tender Loving Care

Now, it is possible to start seeds in just any old soil, but you are really taking your chances; and you probably don't want to have to throw out half of your plants because the soil had some disease in it. For the same reason you will need to sterilize any containers that have had soil in them. The choice of containers is very wide and the way you plant in them just as varied. You do not need to purchase any of those special seed containers that fill the shelves at you local garden center, whatever you have on hand is best for you because it comes at no extra cost. You can use:
  • small and large planters,
  • tin cans, styrafoam cups,
  • plastic containers such as berries come in,
  • egg crates,
  • cardboard box lined with plastic,
  • milk jugs and cartons,
  • yogurt cups,
  • soda cans,
  • pop bottles,
  • sectioned planters from last years plants,
  • and on and on.
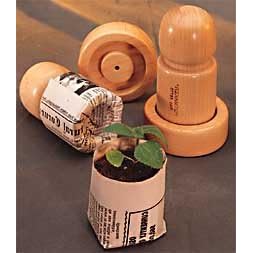
Basically anything that will hold the soil together, and either has holes in the bottom or can be punctured. You can even purchase a nifty little PotMaker that transforms newspaper into perfect sized biodegradable seed pots. What I am using this year is old containers from last year and recycled produce containers. I was able to make some removable dividers from some old plastic salad boxes for the berry containers to separate them into six plant cells. I cut them so that the vertical dividers would lock into the horizontal divider. When it comes time to transplant all I will need to do is wet the soil and pull out the dividers resulting in six separate soil blocks containing the little plants.
I lined the bottom with a piece of wet newspaper before adding the dividers to prevent the soil from escaping while still allowing good drainage. You will want to do this with any container that has large holes.

Once you have your supplies together it is time to get started.
  1. Sterilize containers by washing them in a ten percent bleach solution, rinsing them out and letting them air dry.
  2. Pour your soil into a bin and add water a little at a time mixing it with your hand until it begins to feel like a rung out sponge when squeezed, and starts to hold together.
  3. Fill your pots with the moist soil leaving 1/4 to 1/2 inch of space at the top. Tamp down lightly to create a bouncy soil.
  4. Sprinkle seeds over the surface of large containers and for separated containers that are small or have cells just place 2-4 seeds around the center of the cell. Press seeds lightly so they get good contact with the soil.
  5. Spread dry soil on top of seeds. Your seed packet may have a recommended depth printed on the back. A good rule for how much to spread on is the seed depth in the soil should be about 1-2 times the diameter of the seed. So a seed with the diameter of 1/8" should be covered with 1/8-1/4" soil. It don't have to be perfect though, just somewhere in the vicinity.
  6. Cover with something clear, such as an open zippy bag or plastic wrap (spread over tooth picks placed in the soil and secured with a rubber band), and place in some type of tray to catch any soil or water. My containers had the lids that came with them so I snapped those on and wrapped plastic wrap over the tops to cover the holes.
  7. Place in a warm spot like the top the refrigerator or on a heating pad set on low. Most vegetable seeds do not need light to sprout so you can cover them with a towel to hold moisture and heat when they are just starting.
  8. Check on them every day to see if they are have sprouted. If the soil looks dry mist with water or pour some water into the tray under them. DO NOT pour directly on the soil as that may disturb you little sprouts.
  9. Remove everything off the top once most of them have sprouted and place them in a sunny south facing window. If the window is cold you may want to continue the heating pad until they are well established. At this point you will need to divide the sprouts in the large container and transplant them to their own individual pots. If they were planted in divided pots wait until they have their full two leaves then thin to one strong seedling per pot.
  10. Transplant them to larger pots as thy out grow their little ones unless the pot you started them in is big enough. You can use regular potting soil for that. Normally the ones you start later in the season such as brassicas, squash, and herbs can be transplanted from their small pots directly to the garden whereas the early ones such as tomatoes and peppers need to be transplanted as they get bigger, especially tomatos. I have found that tomatoes need a milk jug size container and peppers a tin can size one.
  11. Harden off your plants when it starts to get close to planting time. For simple instruction for this check out this link. You may start this process early on when you start getting warm days if they are outgrowing your window, just be sure to bring them in at night. I hope to start keeping my larger plants in my cold frame once they outgrow our window, as long as the nights aren't to cold they should be fine if I have started to harden them off.
  12. Transplant to the garden according to each plants transplant date. Normally that is printed on the seed packet in relation to your areas last frost date.
For more information you can find instructions in any basic gardening book such as Gardening 101 by Martha Stewart Living Magazine.

Tuesday, January 27, 2009

The Great Rewards of Simple Planning: Composting

The first area I am going to address is the garden, since right now is the time to be making those preparations even if, like me, you have a couple of feet of snow on the ground. Today it is going to be about making compost.

Composting is the number one way to improve your soil. You can save a lot a money and have a healthy soil by harnessing this natural process. It may takes several months to make but the steps are very easy and can become a part of your daily routine, like taking out the garbage.

1. Set apart an out-of-the-way spot in your yard to be your compost corner. Now you don't want it to be to far from your back door though as you will need to access it every day or two. Your composting can be done in as a heap or you can build an enclosure for it out of pallets or chicken wire (for a cylinder). For simple instructions for several different home built models click here and for more complex here.

2. Begin keeping a compost bucket in your kitchen. The humble ice cream bucket works great and can be stored under the counter near where you normally chop up vegetables. Take it out as it gets to full. I have really been surprised how fast ours fills up. The number of things that can go into it are by no means limited to vegetable scraps. Be sure to also put your coffee grounds (w/filter), tea bags, moldy bread, stale crackers and chips, egg shells, freezer burnt vegetables, and several other non-meat and non-dairy products that have seen their better days.

3. Turn it, water it , leave it. Once it gets around 3 to 5 cubic feet start adding your new additions to a new pile. If it is really cold you just leave it. When it starts feeling like Spring you need to check it about every week or so to make sure it is moist and turn it. It should be ready in 2-4 months. If your in no hurry and can wait a year just put some dirt on top and leave it to do its job.

4. Get it ready for the soil. Compost is mature when it is dark brown. It should be crumbly with very few large particles and have an earthy smell. It will also be about 1/3 its original size. To test it place a small amount into a sealed bag and let it sit for 4 days. If it smells like ammonia or smells rotten it isn't ready. When it is ready sift it through a frame fitted with some hardware wire to remove anything to big. Now it is ready to use. You can either store it in some buckets or apply it straight to the garden as a manure or mulch.

Tuesday, April 01, 2008

Frugal Cleaning Tips


One place to cut down on waste and expense may be your cleaning closet. Over the past year I have started to implement easy ways to save and simplify the way we clean our home. Not only have I saved myself some money but, literally, the headache that comes with using powerful chemical cleaners. Now I find that when I have to clean with regular cleaners it really affects me. I used to just take it for granted that a headache came with cleaning, but thankfully no longer. So here are some tips that have helped me:

1. Make your own cleaners.
This may sound complicated but it is actually really simple. If you can follow a recipe you can make a cleaner. Often they only include a few household items that are poured into a bottle and shook up. For some great recipes I found online visit Clean and Green.


2. Use old rags instead of paper towels and cleaning wipes.
If you are like us you probably have many old wash cloths and dish rags that have seen their better days. Instead of throwing them out, give them a new life in your cleaning closet. To make sure they don't end up in the linen closet after they are washed I snip one corner off to identify them from any others. I normally can clean my bathroom with one rag by starting with the mirror, then the counter and sink, and last of all the commode. Then it gets thrown in the wash, not the trash basket. This has cut our paper towel usage in half. If you usually use a wad of paper towels to protect your hands, like my brothers (it is amazing how wimpy my brothers become when it comes to cleaning the bathroom), you can always buy a cheap pair of latex gloves to keep in the bathroom.


3. Buy supplies in bulk
When you make your own cleaners the supplies are pretty cheap to begin with, but you can save even more by buying in bulk. I can get two gallons of vinegar at our Sam's Club for $3.18 and 12 lbs of baking soda for $5.36. If you don't want to use a membership store you may be able to find the same things at any bulk store such as GFS. If you prefer to use ready-made cleaners you can often find concentrates for these at bulk stores that come out to be very inexpensive per batch.


For more advice and tips to save money visit Frugal Friday at Biblical Womanhood.

Friday, October 19, 2007

Apples, Apples Everywhere!


Apple season is fully here and I am taking advantage of it. Michigan has it’s many beautiful orchards and farms that supply us wonderful fresh apples this time of year. Last week we finally visited one of these orchards. Lined up in a machine shed were neat rows of different kinds of apples. It was a hard choice, but we came home with some Honeycrisp, Jonagold, and Macintosh, mostly Macintosh.

The day after our little trip to the orchard was spent in the kitchen preparing all those apples. Pies, applesauce, apple butter, apple tea and apple jelly are the results of lots of hard, but fun work. My dad especially appreciated all this as he is the apple fan of the family.

What really excited me about all this cooking though was how little waste! In the past when I did my apple cooking I would pull out my apple peeler/corer/slicer, run my apple through it and leave about as much scraps to throw away as I did apples to cook. So this year I decided to put all those peels and cores to work.

First thing they were going to make me was apple jelly. I have never made apple jelly before, I had heard about it but I am not the jelly maker so I never tried to make it. But feeling industrious and having one last box of pectin in the cabinet I took the plunge and looked up a recipe online. I found a few here and here. I used the later and found it very similar to other jelly recipes, you cook the apples down (about 30 minutes) and mash them through a sieve to make juice, then use the juice to make jelly. I’m afraid my jelly didn’t set up very firm, not that there is any fault in the recipe – I actually hope to try it again – but that my pectin was many years old. It is not going to waste though, the resulting syrup is wonderful on pancakes, in oatmeal and to sweeten apple tea.

Making apple jelly has led me to think of other ways to use apple scraps. You could make juice from the cores and peels, syrup from the juice, puree from the peels and also apple tea from dried peels. Although haven’t tried all these ways yet, except the tea, I think they would be wonderful ways of being frugal.

When we really try to be creative with the things we already have it is amazing how much we are blessed. Can you imagine, all those things I made from just six dollars worth of apples? Frugality isn’t just an idea, it is a frame of mind – creativity that can be used to bless our families.

Many Blessings

Wednesday, September 12, 2007

Free Ebooks

Here is a link to 37 free ebooks from Living on a Dime. There are books about organizing, frugality, homeschooling, and cooking.
Enjoy!

Saturday, August 25, 2007

Yogurt Making

Yogurt Recipe
4 c. milk
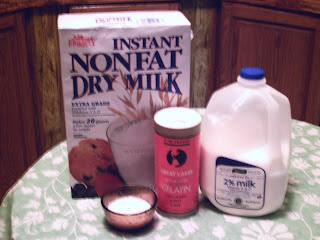
2c dry milk powder
2-3c. warm water
4 T. yogurt (commercial or from last batch, must have live cultures)
3 t. gelatian softend in 1/4 c. cold water

Heat milk over low heat stirring occationally until it reaches 180 degrees (I use a candy thermonitor to check it).

Steralize a two quart jar in two inches of boiling water for a couple minutes.Soften gelitain in cold water.
In two quart jar pour in dry milk. Add heated milk and stir. Pour in hot water leaving room for gelatain and yogurt. Let cool until 125 degrees.

Pour 1 cup warm milk into 4 T. yogurt and stir. Wisk into jar. Stir in gelitain.
Screw lid on tightly and set on heating pad and set to low. Wrap in a old blanket and leave for 8 hours. Transfer to refridgerator and chill overnight.

Friday, August 10, 2007

Frugal Yogurt Tips

I have been making my own yogurt weekly for at least three months. Not only is yogurt making economical and nutritious, but also fairly easy after you get the routine down. If you don't use gelatin in it, you can also make your own cream cheese. This week I will tell you my frugal tips in yogurt making and next week I'll tell you my process.
FRUGAL TIPS FOR YOGURT MAKING:

1. Stretch your starter. In order to make yogurt you need a couple of tablespoons fresh starter; this can be either commercial yogurt with live cultures, or five-day-or-less old homemade (but then you can only repeat that four times). But a little known secret is that you can freeze yogurt without killing the cultures. So what I do is when I get my tub of commercial yogurt home from the store I measure it out by tablespoons into ice cube trays and freeze it. After it freezes I put it in a freezer zipper bag to keep it fresh. The morning before I make yogurt I put a couple cubes in a bowl to thaw and then use it like normal starter. It works every time.

2. You don't need a yogurt maker. Although helpful, these are unnecessary and just take up more room in your kitchen. I wrap my two quart canning jar in a old blanket and set it on top of a heating pad set on low. Leave it for 8 hours and it is done!

3. You can use reconstituted dry milk. When I first started making yogurt I used the recipe out of the More with Less Cookbook. It used 6 cups water (heated to 125F), 3 cups powdered milk, and either 1 cup scalded whole milk or 1 can evaporated milk. It wasn't as creamy but it tasted the same as using fresh milk.
Next week I will tell you my process and give you some great recipes for using yogurt and making yogurt cheese.

Thursday, August 09, 2007

Sewing: Skort


Here is my latest sewing project. I got the fabric on sale at Joanns when they had 70%off their spring fabrics. I really like how this turned out.


Skort in standing position
Underneath the skirt: culottes
Cute tied waistband
Zipper opening

This is the third time I have made this pattern. Once I made the long one with two buttons in front and the other time I ajusted it to be a elastic waistband for my swimsuit. I highly recommend this pattern, it is modest and functional, great for activities that involve a lot of movement. I just suggest you chose a light fabric for summer because the double layer can get warm. A thicker fabric will be nice and warm for winter activities. Of course wait to buy the pattern until it is on sale at Joann's or Hobby Lobby for $1 to $2. =)

Friday, August 03, 2007

Cut Butter Cost In Half: with your own spreadable butter


Our family has some heavy butter users in it, and with the cost of butter going up that can really cost you. A few years ago my Mom started making our own spreadable butter. By mixing half softened butter and half canola oil (other oils work too) with our hand blender, we got a firm yet spreadable butter when chilled. It is just as delicious as regular butter, but nearly half the cost. You can also blend it in a food processor, use a hand mixer, or regular blender. I typically blend 2 lbs of butter with 4 cups oil at once to save time and clean up. You may just want to do one stick with 1/2 c. oil the first time to see if you like it. You can use this blend in some baking when either oil or butter can be used. My favorite cookie recipe uses it.

The Best Chocolate Chip Cookies

Sift together:
2 1/2 c. flour
1/2 t. baking soda
1/2 t. salt

In separate bowl cream together:
1 c. spreadable butter (1/2 oil, 1/2 butter)
1 c. brown sugar
1/2 c. sugar

Add and blend well:
2 eggs
1 t. vanilla

Gradually stir in dry mixture.
Fold in:
1-12oz bag chocolate chips
1 c. chopped nuts

Drop dough by rounded teaspoonfuls on ungreased cookie sheets. Bake at 375F for 8-10 minutes. Makes 5 dozen. Beware: doesn't last long!

Enjoy!

Thursday, July 26, 2007

Hummingbirds


Ruby-throated Hummingbird (Archilochus colubris)

Physical Description
Average length: 3.5 inches (8.9 cm)
Average weight: 1/8 ounce (3.1 g)
Body temperature: 105°-108°F (40.5°-42.2°C)
Wing beats: 40-80 per second, average about 52
Respiration: 250 per minute
Heart rate: 250 beats/min resting; 1200 beats/min feeding
Flight speed: 30 mph (48 kph) normal; 50 mph (80 kph) escape; 63 mph (101 kph) dive [2]

Here is some great information on these beautiful birds and the proper way to freed them:
Hummingbirds are small birds in the family Trochilidae, native only to the Americas. They are known for their ability to hover in mid-air by rapidly flapping their wings, 15–80 times per second (depending on the species). The Giant Hummingbird's wings beat 8–10 beats per second, the wings of medium sized hummingbirds beat about 20–25 beats per second and the smallest beat 70 beats per second. Capable of sustained hovering, the hummingbird has the ability to fly deliberately backwards (this is the only group of birds able to do so) or vertically, and to maintain position while drinking from flower blossoms. They are named for the characteristic hum made by their wings.[1]

The diet of hummingbirds requires an energy source (typically nectar) and a protein source (typically small insects). Providing many plants that carry blooms used by hummingbirds is the safest way to provide nectar for hummingbirds...Homemade nectar can be made from 1 part white, granulated table sugar to 4 parts water, boiled to make it easier to dissolve the sugar and to purify the solution so that it will stay fresh longer. The water should be boiled before measuring to ensure that the ratio of sugar to water remains 1–4. The cooled nectar is then poured into the feeder.

Things to avoid using in feeders include honey, which should not be used because it is prone to culture bacteria dangerous to hummingbirds. Artificial sweeteners should also be avoided because, although the hummingbirds will drink it, they will be starved of the calories they need to sustain their metabolism. Some commercial hummingbird foods contain red dyes and preservatives, which are unnecessary and possibly dangerous to the birds, so dyes and preservatives should be avoided because neither have been studied for long-term effects on hummingbirds. While it is true that bright colors, especially red, initially attract hummingbirds more quickly than others, it is better to use a feeder that has some red on it, rather than coloring the liquid offered in it. It is possible that red dye is harmful to hummingbirds. Commercial nectar mixes may contain small amounts of mineral nutrients which are useful to hummingbirds, but hummingbirds get all the nutrients they need from the insects they eat, not from nectar, so the added nutrients also are unnecessary. Authorities on hummingbirds recommend that if you use a feeder, use just plain sugar and water.

A hummingbird feeder should be easy to refill and keep clean. Prepared nectar can be refrigerated for 1–2 weeks before being used, but once placed outdoors it will only remain fresh for 2–4 days in hot weather, or 4–6 days in moderate weather, before turning cloudy or developing mold. When changing the nectar, the feeder should be rinsed thoroughly with warm tap water, flushing the reservoir and ports to remove any contamination or sugar build-up. If dish soap is used, it always needs extra rinsing so that no residue is left behind. The feeder can be soaked in dilute chlorine bleach if black specks of mold appear and rinsed with clear water.[1]

"O LORD, how manifold are thy works! in wisdom hast thou made them all: the earth is full of thy riches." Psalm 104:24

1 Wikipedia, 2007

2 Hummingbirds.net